
Well we have hit a bit of warm weather here in normally cool England. It got up to about 23-24 here in Southend which means everyone is complaining about how hot it is but this old Florida girl says it's just right!
Anyway, dinner tonight was everything from the stores of the cupboard/freezer. I used to be a vegetarian but we still eat that way about 3-4 times in the week. Tonight was Quorn fillets that are plain - and I usually just cover them in BBQ sauce but tonight I wanted to use up some potatoes and an onion that was sitting in the fridge - I want nothing to go to waste in this house. So thought I'd make a white mushroom sauce that goes over the fillets and cooks into a gravy in the oven. I know - the oven on with that kind of temperature?! But it wasn't in for long - only about half an hour at most.
So my basic sauce was 1 ounce of butter in a sauce pan, to which I added my chopped onion. I let that sit for about 1-2 minutes just until they begin to soften - not brown! I then added about 1 ounce of flour to this and let it cook for 2 minutes until it just turns a bit darker in colour. I then added some water and then stirred. I must be lucky when I do this as everyone complains that they get lumps - I somehow do not. I then added the mushrooms (they came from the cupboard) and then added some Marigold Swiss Vegetable Bouillon (about 1/4 teaspoon) to the now sauce. I love Marigold - I use this for my doodle-noodles as I call them (yet another idea to post about!) and just about anything I want to add flavour to without having to cut a bouillon cube. I then added a bit of salt and pepper along with a bit of ground coriander, and a pinch of cumin. I let this cook for about 5 minutes and voila - mushroom sauce for the Quorn as you can see below - pre-cooked in the oven. OK - I'm not a professional photographer nor do I make the item I'm cooking just so - I don't have time for that. While some do - and hats off to you I am all about the real thing - it might not be five-star presentation but it's GOOD and works for this house.
This is the end product - the gravy as it turns to once in the oven for a bit was put over the potatoes and some steamed veg. As you can see - just a rustic on the plate - I'm not that into the looks. Something can look amazing and not be what you want. This is OK and is what I want. Now for the cookery pamphlets. I don't know why I collect them - now I only pick up ones that really interest me in one way or another. The older the better and as usual these are just a very small sample of what I have. The Trex one is obviously British (it's comparable to US Crisco), the other one from Rochester came from my friend TOV, and the other was my Aunt's which I inherited.
 I love how they often have helpful charts - often you find a lot of English recipes will refer to a hot oven, or gas mark 3. These were meaningless terms to me but as you live here you begin to understand what they mean. I think most cooks now do a Celsius or Fahrenheit temperature - the only one to keep to the old terms is Delia Smith.
 I also love some of the really odd names for the recipes - it just makes you want to try each one out to figure out how the name came about...
 I remember the day I found this cookbook. It was in Brandon, Florida in this book store that had all manner of books - new and used. I wandered those shelves many a day and never tired of it. But the title said it all for me! So of course you know I had to have it. I don't think I paid more than $10 for it and while that's a princely sum in my book it was worth it for the cover alone.
  I saw a show recently - Cook's County which showed this book or at least a similar vintage which was apparently first published in 1901. This edition is a 1930's edition.
 I love that this cook book looks like it has been well used. To some this is a detraction and wouldn't even consider buying it. I look at it as someone must have loved making that recipe and that they really got into their cooking. I'm rather the same - you'd never believe the state of some of my t-shirts which are really terrible when I've really gotten into something! All I can say is that I keep pre-wash spray in business! =)
So now go off and find something that you love and begin a collection, you never know where it will lead and isn't that the best thing? I think so.... Enjoy!
21 April 2011
Dinner and the love of old cookery pamphlets
17 April 2011
It's all about the starter!
I thought I might show you some pictures of my starter. I began this back in March 2010 and so far it has been kept going despite my neglect at times during the year. I don’t mean this was on purpose – there are just times when I don’t bake bread or some yeast product and the starter just ends up sitting in the fridge for a week or two....or even oops three!
I followed Dan Lepard’s recipe from The Handmade Loaf for how to begin a starter and while March probably isn’t the warmest month (at least in England it isn't!) it was an unseasonably warm time last year. Up until this time I had been using Richard Bertinet’s recipe in Dough for all my bread needs – and I still do but I have adapted it to work with my starter. This means I tend to not use as as much water (as the recipe calls for) when mixing the dough with the addition of the starter (as that has water but flour also). But I also let it just sit a while to absorb the water before I begin to knead it. This has the effect of letting it autolyse but also means LESS work! Now that's for me!
I’m probably one of those people you hate – I can take a recipe and pretty much re-invent it with other things that I like and it will come out quite good. I do follow recipes when beginning out on a culinary trail to perfect a skill but soon I diverge onto my own road and doing it my own way. This might not be the ‘proper’ way but in the end does it matter? Isn’t this how other authors come out with new recipes? I might not be an author (yet!) but I have my own likes/dislikes and will always come out with something that is truly my own.
So back to the starter, which I’ve given you several pictures of it throughout a day so that you can get an idea of what it should look like. I think that is why I found Dan’s book so helpful – it gave you daily pictures to judge by. Although I must admit mine took a bit longer to proof but I chalked that up to the cold. However, the starter eventually began to mimic the pictures in the book which was most helpful when I’ve never done something like this before.
Personally, I like pictures - it gives me something to aim for. Yes, they are made perfect by food prop editors and such but I like to know the result. Mine might never come in 100% perfect but I'm not aiming for that - I just want an idea that I'm on the the right track. My cakes, breads or whatever I make are my own creations. As long as they taste good I'm home free!
This first picture is the original starter from the fridge that I’ve transferred to a new container - obviously I've discarded half of it and this is the half that I keep and feed (the other half was used for my bread below). After a while the container begins to look a bit worse for the wear so I transfer it about ever 3-4 months – it just depends. This next picture is after I have stirred in some water so that the starter will accept the new flour. I think in Dan’s book he says to use bottled water – which I don’t buy. I tend to use cool boiled water from when I’ve made tea, I used that water to add to the starter. I now don’t measure the additions as I used to – I just do it by feel and look. I suppose this is how I do a lot of my cooking – I just know what it should be like and have often been tested in my weights and measures. I have found I come usually within one to two grams of just about any measure. How’s that for accuracy?
 These next two pictures are the flour being added and then the final starter mix. I found that you can add just about any flour you like. If your starter is not getting active (those bubbles are showing you the yeast is active) then I add a bit of rye flour or whole-wheat spelt flour. This will really get it going and in fact I think you can see some flecks from rye flour still in the starter. It also adds a good deal of flavour! I read somewhere it lowers the pH of the starter to allow more yeast which is all so technical – I just know it works!
 These next two pictures if after about an hour or two after I added the water/flour to the mixture, as you can see it has risen a bit from its original amount – just slightly but there a number of bubbles on the top of the starter.
 Now, these next two pictures show you that the starter has risen significantly up the jar (you see why I have to change it – sometimes it’s over active and leaves a mess behind!) and there are now plenty of bubbles which show it’s active.

 These last two pictures are my bread rising via what I call solar power. I love the sun and its help with making everything rise. If I don’t have the sun (as is often the case in the winter) I put it in what I call my big, expensive bread oven (the microwave) with a glass of boiling water. This gives it enough heat and moisture to rise albeit slower than without a sun but C'est la vie we live in England! I have found that I can leaven the bread with only the starter but over a much longer period. If I want bread that day I usually have to use about ½ to ¾ of a teaspoon of yeast. The longer period obviously helps develop the flavour but I have found the longer my starter has lived the more flavour it develops. I hate waiting.... =)
 My bread keeps generally for around a week. I put it in a brown paper bag and just clip it closed. It will get a bit hard on the crust surrounding the bread but the inside is still quite soft. If by the end of the week I've not used it all I'll make something with it. This usually depends on the time of year - summertime it will become croutons and in the winter I'll make bread crumbs. I have a container that I keep them in and as long as you have thoroughly dried them they keep.
My easy recipe for croutons is cube the bread and place on a cookie sheet. Sprinkle on some salt, pepper, garlic granules, and some olive oil. Toss them all with your hands and then place in a hot oven (about 190-200 degrees Celsius) for about 7-10 minutes - until they are toasted (I usually turn them over about half-way through the cooking). They come out quite crunchy and will keep about a week in an air-tight container. I used to make them on top of the cooker but found that was too much - oven means less work!
Well I hope you enjoyed that pictorial of my starter. I have been amazed that it has kept going and that it just gets better with time. Oh, I didn’t follow the recipe for the initial starter either – I remember it called for yoghurt of which I only had some plain Greek yoghurt at the time – so I used that. So you see – Rebel against Recipes as always!
I'm off for all the big holidays next week and have decided I'm going to try making croissants. I know - they look difficult but I figure I've done brioche now so why not the next step. I am still not prepared for puff pastry but perhaps this will be a happy compromise. I'll post something soon so watch this space!
9 April 2011
Everything is on the rise!
Well as the picture below shows you - everything is going up but food is as always an important measure of inflation.  So I begin my posting with leftovers. I know a lot of people who say they don't like them or worse yet don't even know what to do with their leftovers and goodness no - throw them OUT! What a waste! Honestly, it should be a crime to throw out food - which is something that as a nation we should be ashamed of!
As I said in my previous posting I try to eke out the most that I can from something I buy. I especially do this with any bones from my meat joints as goodness knows you paid for that bone - you should get your money's worth. The dinner I made with my left over leg of lamb was a Lamb and Barley soup/stew. I cut up my meat and the left over potatoes that were roasted. I also added a few carrots that I chopped up. I then put into the pan the bone along with an onion which I then sweated down for a bit (about 3-5 minutes). I then added that lovely bowl of gravy that I cleaned from the pan when I originally roasted the lamb.  Once the bone left behind it's flavour (after about 20 minutes) I fished that out and then added some barley and left that simmer for about 45 minutes. I then added my chopped up meat and veg to the pan and left that for another 30 minutes or so. By this time the barley was tender and the other items soft and ready to be consumed.
 It cost me originally £6.80 and that would be a very expensive meal for two people. But since I made this meal that means it cost me £6.80 divided by 2 which equals £3.40 per meal or £1.70 per person. Yes, I know that doesn't count the other items in the meal but I tend to base my meals around the main ingredient - the other items I have on hand and would do.
But in fact this meal leftover made me dinner for two and lunch for two days at work so now we are talking even less. However, I will keep to the cost of a per meal basis but this is how you have to think of things when shopping. I had the initial layout of cost for the meat but it brought me a load of meals that made it very thrifty.
I must admit that when I cook I always think of things to bring in for my lunch. In the winter I hate having anything cold - it's already cold who wants that again for a meal? If I'm making something that includes rice - I usually cook another 2 ounces of it for my lunch so that I can just re-heat it and away I go. Same with soup or pasta or something similar. As I have said before you only have to begin to get into the habit for it to then just become a regular thing and not something that you think about. In the summer or warmer months where I don't eat sandwiches (never really been a sandwich person!) I make salads and have that or tabouleh which just gets better over time sitting in the fridge.
So the next time you have a roast - think what else can I make with this and try it. It's all in the mind and just waiting to come out with your imagination - so just let it! Enjoy.
1 April 2011
Polish poppy seed bread - just the prep side
I forgot to attach these photos yesterday about the prep I did for the poppy seed bread I made. I posted a recipe for this previously and I have varied it a bit - this time I used some whole almonds that I processed with the poppy seeds which I think added a good 'almondy' taste to the whole thing. I also added some almond extract along with the vanilla extract - it seems to have given it more punch in the final product. I used my basic sweet dough recipe but of course with some of my starter (I'll have to document that another day for you!) which had a bit of rye flour in it (you'll see brown flecks in the last photo). 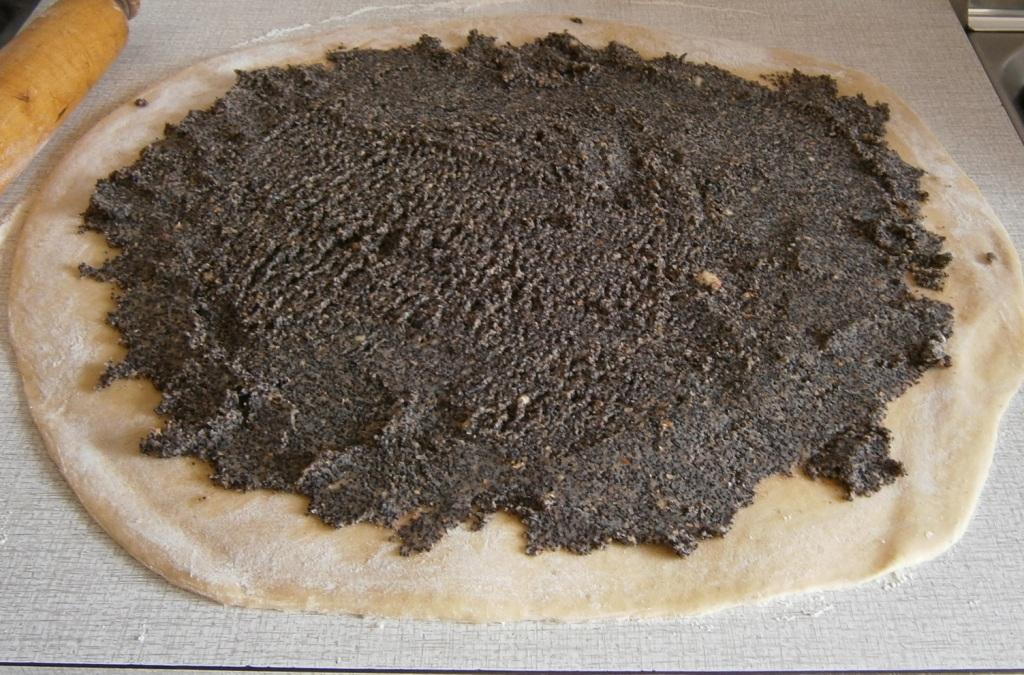 As you can see the poppy seed filling is very thick - this is more how I remember it being as a child. I think all we can ever do is approximate things from that era - as your tastes vary in life and you go on to taste/try different things so this sometimes becomes a bit distorted. I also cut back on the sugar as well which I think helped it be not too sweet.
 This is rolling it up - which isn't a difficult thing to do if you've floured your counter properly
 And here it is on the tray ready to proof and then go into the oven. I've learned to always use parchment paper on all my trays. It helps with the clean-up but it just ensures a consistent colour to the crust.
I didn't get a post-baking picture - which I forgot to take but mainly I was waiting for some media as I was using the internal memory and just didn't have any space left to take a picture. I did glaze the bread this time - with an egg yolk - no white and I found it to be a great tip for glazing. It came out with a much more lovely mahogany colour.
I also sprinkled it with some pearl sugar - not something that is found here in the UK but I got some from King Arthur Flour who will ship outside the US - you just have to call them and they'll send most items to you. I tend to do this with small items that really are just not available here - like their cinnamon, pearl sugar, baker's ammonia, etc. Apparently this is something you can find in Sweden and places like that but I've never seen it here.
OK - time to scoot and do other stuff. I'm sure I'll be posting more now with the new camera to take better pictures with. I'll have to see how I upload videos as well, since the camera will do that too. Oh the fun! Enjoy!
